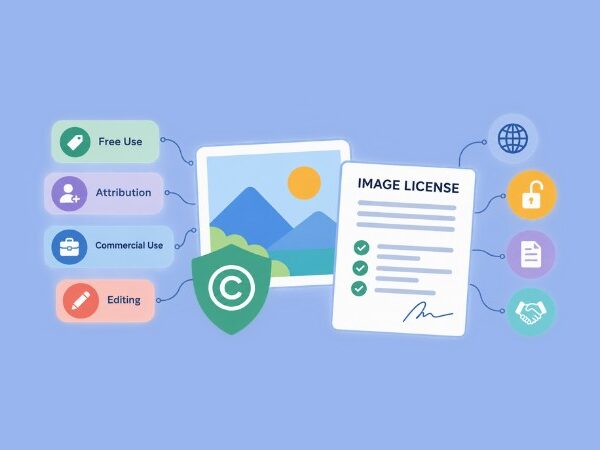
You can write the most helpful blog post in the world, but if your images fail to grab attention, many readers may scroll right past it.
We live in a visual-first world. Every day, people see thousands of images on websites, social media platforms, search engines, and mobile devices. As bloggers, we have only a few seconds to convince visitors to stop scrolling and start reading.
We have learned over the years that great blog images can make a huge difference. A strong image attracts clicks, improves engagement, supports your message, and helps readers remember your content. On the other hand, low-quality visuals can make even excellent content look less trustworthy.
The good news is that creating stunning blog images no longer requires advanced design skills or expensive software. With the right approach and tools, anyone can create professional-looking visuals that enhance their blog and attract more readers.
In this guide, you will learn how to create eye-catching blog images that strengthen your content, improve user experience, and help your blog stand out from the crowd.
Why Blog Images Matter More Than Ever
Before diving into the design process, it is important to understand why images play such a critical role in blogging.
Studies consistently show that people process visual information much faster than text. Images help readers understand concepts quickly and make content easier to consume. A strong image can instantly communicate an idea, capture attention, and encourage visitors to keep reading.
Images also improve the reading experience by breaking up large blocks of text and making content feel more engaging. They help reinforce key points, make information easier to remember, and can even support SEO when properly optimized.
When used effectively, blog images become powerful tools for attracting readers and keeping them engaged.
Strong blog visuals can:
- Increase click-through rates.
- Improve social media shares.
- Reduce bounce rates.
- Make articles easier to read.
- Strengthen your brand identity.
- Improve content retention.
Think about your own browsing habits. Which article would you click first?
A post with a compelling featured image or a post with no image at all?
Most people choose the visually appealing option.
Start With a Clear Purpose
One of the biggest mistakes bloggers make is creating images without a clear goal. This often leads to visuals that look nice but fail to support the actual message of the blog post.
When there is no clear purpose, the image becomes just decoration instead of a meaningful part of the content.
Before opening a design tool, ask yourself:
- What message should this image communicate?
- Who is the target audience?
- What action do I want readers to take?
- Will this image educate, inspire, or attract attention?
Every image should support the content rather than simply fill empty space.
For example:
- Tutorials benefit from screenshots.
- Data-heavy articles benefit from charts and infographics.
- Inspirational content benefits from emotional photography.
- Product reviews benefit from product images.
When the image aligns with the purpose of the content, readers naturally engage more.
Choose High-Quality Visuals
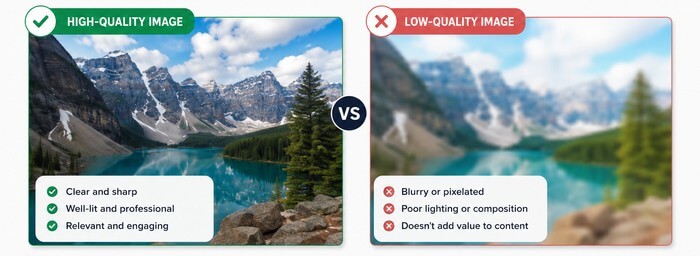
Nothing hurts a blog’s appearance faster than blurry or pixelated images. They instantly reduce trust and make even well-written content feel unprofessional. Readers may assume the content itself lacks quality if the visuals look poorly made.
Always start with high-quality visuals. Clear, sharp images create a stronger first impression and help your blog appear more credible and polished. Even simple designs look significantly better when the base image is crisp and properly sized.
Great Sources for Free Images
Here are some trusted websites offering free stock photos that you can safely use in your blog posts without worrying about licensing issues.
These platforms provide high-quality visuals suitable for almost any niche, from business and technology to lifestyle and travel.
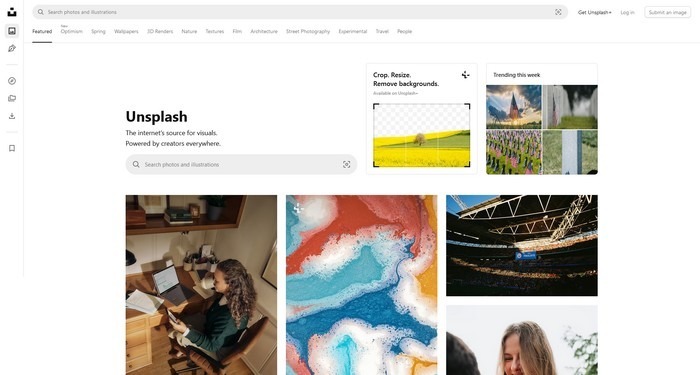
Unsplash is one of the most popular sources for free, high-resolution stock photography. It offers millions of professional-quality images contributed by photographers from around the world, covering topics such as business, technology, travel, nature, and lifestyle.
Most photos on Unsplash can be used for both personal and commercial projects without attribution, making it an excellent resource for bloggers looking for stunning visuals to enhance their content.
These platforms provide professional-quality images suitable for commercial use.
What Makes a Good Blog Image?
Good blog images should immediately feel relevant to your topic and support the message of your content. It should also be visually clear, well-composed, and emotionally engaging enough to capture attention within seconds.
Beyond appearance, the image should enhance understanding and help readers connect more easily with your ideas.
Look for images that are:
- Sharp and clear.
- Properly exposed.
- Relevant to the topic.
- Emotionally engaging.
- Modern and authentic.
Avoid overly staged photos whenever possible. Readers tend to connect more with natural-looking images.
Create a Strong Featured Image
Your featured image is often the first thing readers see. It acts like a visual headline that sets the tone for your entire article.
A strong featured image can quickly grab attention and encourage readers to click through and explore your content.
It appears in:
- Search results.
- Social media shares.
- Blog archives.
- Related post sections.
Because of this, it deserves extra attention.
Elements of an Effective Featured Image
Clear Headline:
Include a short, readable title that summarizes the article.
Example: “10 Blogging Tips for Beginners“
instead of
“Things You Should Know Before Starting a Blog and Growing an Audience“
Keep text concise.
Strong Contrast:
Make sure text stands out against the background.
Dark text works best on light backgrounds.
Light text works best on dark backgrounds.
Visual Hierarchy:
Guide the viewer’s eyes toward the most important element.
Usually this means:
- Main headline.
- Supporting graphic.
- Brand logo.
A clean design often outperforms a cluttered one.
Use Consistent Branding
Successful blogs develop a recognizable visual style.
When readers repeatedly see your blog images, they should immediately recognize your brand. This familiarity helps build a stronger connection with your audience over time and makes your content stand out in a crowded feed.
Consistency creates trust and professionalism. It also makes your blog look more organized and intentional, which can improve how readers perceive your expertise and credibility.
Consider using:
- The same color palette.
- Consistent fonts.
- Similar layouts.
- Branded logos.
- Repeating design elements.
Over time, your visuals become part of your identity.
Even large brands rely heavily on visual consistency because it improves recognition and credibility.
Select Colors That Attract Attention
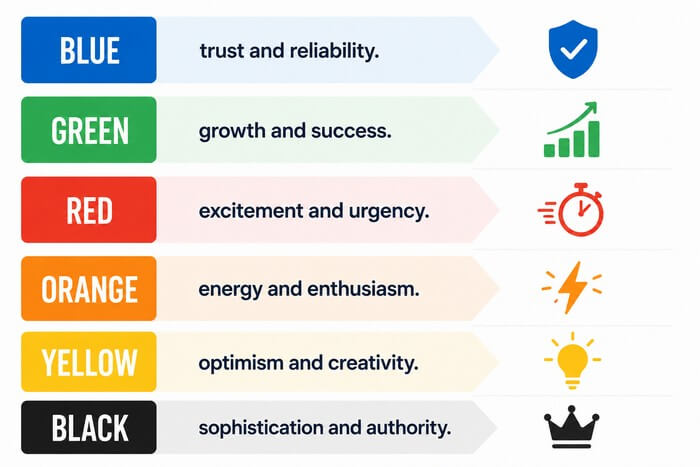
Color influences emotions and behavior more than many people realize. It can shape how readers feel about your content within seconds of seeing an image. The right color choices can make your visuals more inviting, persuasive, and memorable.
Different colors create different impressions. That is why it is important to choose a palette that matches your blog’s tone and message, so your images consistently support the mood you want to communicate.
Popular Color Associations:
You don’t need dozens of colors.
In fact, limiting your palette often creates a cleaner and more professional look.
A simple combination of two or three primary colors is usually enough.
Use Easy-to-Read Typography
Typography can make or break blog images. Poor font choices can distract readers and reduce the overall impact of your design, even if the image itself is strong. Good typography supports clarity and helps guide the reader’s attention naturally through the message.
Readers should understand your message instantly. That is why fonts must be clean, readable, and well-balanced with the rest of the visual elements.
Typography Best Practices:
- Use large font sizes.
- Choose clean fonts.
- Avoid excessive styling.
- Maintain strong contrast.
- Limit yourself to two fonts.
Popular choices include:
Fancy fonts may look attractive initially, but readability should always come first.
If people struggle to read your text, the image loses its effectiveness.
Add Visual Hierarchy
Visual hierarchy tells readers where to look first. It helps organize elements so the most important message stands out immediately. A clear hierarchy guides the viewer’s eye in a natural flow instead of overwhelming them with equal visual weight everywhere.
Without it, an image can feel confusing. Readers may not know what to focus on, which reduces the impact of your message and makes the design less effective overall.
Ways to Create Hierarchy
Use Larger Text:
The most important message should be the largest element.
Add White Space:
White space gives designs room to breathe.
Many beginner designers try to fill every empty area.
Professional designers often do the opposite.
Use Contrasting Elements:
Contrast naturally draws attention.
This could involve:
- Color contrast.
- Size contrast.
- Shape contrast.
- Brightness contrast.
These techniques guide readers through the design naturally.
Create Custom Graphics and Infographics
Original graphics can dramatically increase engagement. They make your content feel more unique, trustworthy, and tailored instead of generic. When readers see visuals that are clearly created for a specific message, they are more likely to pay attention and interact with the content.
Instead of relying entirely on stock photography, create visuals specifically designed for your content. This helps you build a stronger brand identity and gives your blog a more professional and memorable look over time.
Examples of Useful Graphics:
- Infographics.
- Process diagrams.
- Comparison charts.
- Statistics visuals.
- Step-by-step guides.
- Timelines.
Custom visuals often attract backlinks because other websites may reference them as sources.
They also help readers understand complex information more quickly.
Optimize Images for SEO
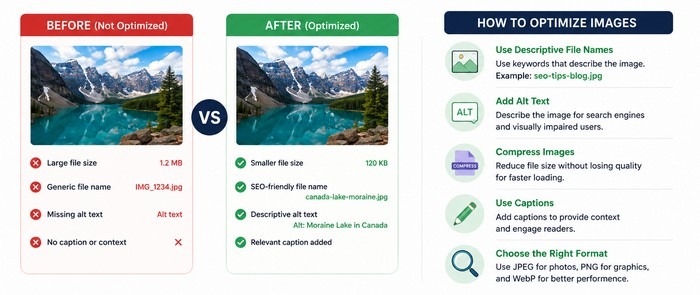
Beautiful images are important. They immediately improve the look and feel of your blog, making your content more appealing and enjoyable to read. A visually attractive blog also helps keep visitors on the page longer, which can positively influence engagement.
Search engine optimization is equally important. Without proper optimization, even the best images may not deliver their full value in terms of traffic and visibility.
Image SEO helps search engines understand your content and can drive additional traffic through image search results. It also improves accessibility and ensures your blog images are properly indexed, helping your blog perform better overall.
Use Descriptive File Names:
Bad example:
image123.jpg
Good example:
how-to-create-blog-images.jpg
Write Effective Alt Text:
Alt text describes the image to search engines and screen readers.
Example:
“Designer creating a featured image for a blog post using graphic design software.”
Compress Image Files:
Large images slow down websites.
Use optimization tools like:
Faster websites create a better user experience and often perform better in search results.
Design for Mobile Users
Internet traffic today from mobile devices is 51.04% to 64.35% of all internet traffic. This means your blog images must be designed with smaller screens in mind, not just large desktop displays. Mobile users often scroll quickly, so clarity and simplicity become even more important.
An image that looks fantastic on a desktop may appear crowded on a smartphone. Text can become unreadable, and important details may get lost if the layout is not optimized for smaller screens.
Always check:
- Font sizes.
- Cropping.
- Spacing.
- Readability.
Test your blog images on multiple screen sizes before publishing.
Simple designs typically perform best across devices.
Use AI Design Tools Wisely
Artificial intelligence has made image creation easier than ever. It allows bloggers to design visuals faster, experiment with ideas, and produce professional-looking graphics without advanced design skills.
Tools like Canva AI, Adobe Express AI, and image generators can help speed up your workflow. These platforms are especially useful when you need quick drafts, layout ideas, or inspiration for new designs.
However, AI should enhance creativity rather than replace it. Relying too heavily on automated designs can lead to generic visuals that lack personality or brand identity.
The best results usually come from combining AI assistance with your own judgment and branding. This balance ensures your images still feel original and aligned with your blog’s voice.
Review all generated blog images carefully before publishing. Small details like spacing, font choice, and color balance can make a big difference in overall quality.
Make adjustments so the final design feels unique and aligned with your blog. This extra step helps your visuals stand out and maintain a consistent, professional look across your content.
Common Blog Image Mistakes to Avoid
Even experienced bloggers occasionally make mistakes. No matter how long someone has been creating content, it is easy to overlook small details that affect image quality or clarity. These errors can slowly reduce the overall impact of a blog if they are not addressed.
That is why it is important to regularly review your blog images and keep improving your design approach. A simple check before publishing can often prevent issues and help maintain a more professional and consistent look across your blog.
Here are some common issues to watch for:
Too Much Text:
Large blocks of text overwhelm readers.
Keep messaging short and impactful.
Inconsistent Branding:
Switching colors, fonts, and layouts frequently can confuse readers.
Poor Quality Images:
Low-resolution images reduce credibility.
Ignoring Mobile Devices:
Always test images on smaller screens.
Overusing Effects:
Excessive shadows, gradients, and filters often make designs look dated.
Simple and clean designs tend to perform better.
Recommended Tools for Creating Stunning Blog Images
You do not need expensive software to create professional blog images. Many free and affordable tools offer powerful features that are more than enough for most blogging needs. With the right approach, even simple tools can produce high-quality, eye-catching designs.
What matters more than the software itself is how you use it. A clear idea, consistent branding, and attention to detail will always have a bigger impact than costly design programs.
Beginner-Friendly Tools
Canva: Easy Image Creation for Bloggers
Canva is a popular design tool that makes it easy to create professional-looking blog images using drag-and-drop editing, templates, stock photos, and graphics. It is beginner-friendly and requires no advanced design skills.
This tool offers a free plan with many useful features, while Canva Pro provides access to premium templates, stock media, and advanced tools for a monthly or annual fee.
Images created in Canva can generally be used for both personal and commercial projects, including blogs and websites, though it’s always wise to review Canva’s current licensing terms for specific content.
Adobe Express: Professional Designs Made Simple
Adobe Express is a user-friendly design tool that enables bloggers to create high-quality images, social media graphics, and marketing materials.
It includes customizable templates, stock assets, and AI-powered creativity and features that simplify the design process.
It offers a free plan with essential tools, while premium plans provide access to additional templates, stock content, and advanced features.
Designs created with Adobe Express can generally be used for personal and commercial projects, but it is recommended to review Adobe’s licensing terms for specific assets and content.
VistaCreate: Fast and Creative Visual Design
VistaCreate is a user-friendly graphic design platform that helps bloggers create eye-catching blog images, social media posts, and marketing graphics with minimal effort. It offers a wide selection of templates, photos, animations, and design elements that can be customized in just a few clicks.
The platform offers a free plan with access to many design tools and templates, while its Pro plan unlocks additional premium content and features.
Designs created with VistaCreate can generally be used for personal and commercial purposes, though it’s a good idea to review the platform’s current licensing terms for specific assets.
Advanced Tools
Adobe Photoshop: The Industry Standard for Image Editing
Adobe Photoshop is one of the most powerful image editing tools available and is widely used by professional designers, photographers, and content creators. It offers advanced features for photo editing, graphic design, image manipulation, and creating custom blog visuals.
Photoshop is available through a paid subscription as part of Adobe Creative Cloud. Images you create yourself in Photoshop are fully yours to use for personal and commercial projects, while any stock assets used should follow the applicable Adobe licensing terms.
Adobe Illustrator: Precision Design for Scalable Graphics
Adobe Illustrator is a professional vector design tool used to create sharp, scalable graphics such as logos, icons, illustrations, and blog visuals. It is especially useful when you need clean designs that stay crisp at any size, from small thumbnails to large banners.
Illustrator is available through a paid Adobe Creative Cloud subscription. Designs you create are generally free to use for personal and commercial projects, but any included stock assets or fonts should follow Adobe’s licensing terms to ensure proper usage.
Affinity Designer: Powerful Design Without Subscription Fees
Affinity Designer is a professional vector and raster design tool used for creating logos, illustrations, blog images, and detailed visual content. It is known for its smooth performance, precision tools, and ability to handle both simple and complex design projects.
Unlike many competitors, Affinity Designer is available as a one-time purchase rather than a subscription, making it a cost-effective option for long-term use.
Designs you create are generally free for personal and commercial projects, while any third-party assets such as fonts or stock images should follow their respective licensing terms.
Image Optimization Tools
TinyPNG: Simple Image Compression for Faster Blogs
TinyPNG is a popular online tool used to compress images without significantly losing quality. It helps bloggers reduce file sizes so their websites load faster, improving both user experience and SEO performance.
This tool offers a free version with basic compression features, while a paid plan provides additional options like higher usage limits and bulk processing.
Images processed through TinyPNG can be used freely in your blog or commercial projects, as the tool only optimizes your files and blog images and does not affect ownership or licensing of your original images.
Imagify: Easy Image Optimization for Faster Websites
Imagify is a powerful image compression tool designed to help bloggers and website owners reduce image file sizes without losing noticeable quality. It supports automatic optimization, making it especially useful for WordPress users who want faster page load times and better SEO performance.
Imagify offers a free plan with limited monthly usage, while paid plans provide higher compression limits and additional optimization features. The tool does not claim ownership of your images, so you retain full rights to use your optimized visuals for personal and commercial purposes.
ShortPixel: Smart Image Compression for Better Performance
ShortPixel is an image optimization tool that helps bloggers reduce file sizes while maintaining good visual quality. It is widely used to improve website speed, enhance user experience, and support better SEO rankings through faster-loading pages.
This image optimization tool offers a free plan with a monthly limit and several paid plans for higher usage needs. You keep full ownership of your images, and the tool simply compresses and optimizes your files for web use, making them suitable for both personal and commercial projects.
Choose the tools that match your skill level and workflow.
The best tool is the one you can use consistently and efficiently to create visuals and blog images.
A Simple Workflow You Can Follow
Having a simple workflow makes the process of creating blog images much faster and more consistent. It removes guesswork and helps you stay organized, especially when you are working on multiple posts at once.
Over time, a repeatable system also improves the overall quality of your blog images.
A structured approach also reduces mistakes and saves time during editing. When you follow the same steps each time, you can focus more on creativity instead of figuring out what to do next.
- High-quality photo.
- Add a short headline.
- Apply your brand colors.
- Use readable fonts.
- Check mobile appearance.
- Compress the image.
- Add alt text and SEO-friendly file names.
- Publish and monitor engagement.
Following a repeatable workflow saves time and improves consistency.
Final Thoughts
Pixwizify is a useful resource that can help bloggers quickly create and optimize eye-catching blog images, making the design process faster and more efficient without sacrificing quality.
Creating stunning blog images is not about becoming a professional designer. It’s about communicating your message clearly and helping readers engage with your content.
The most effective blog images combine strong visuals, clear messaging, consistent branding, and smart SEO practices. When these elements work together, your images become powerful tools that attract visitors and keep them engaged.
Start simple. Focus on quality over complexity. Pay attention to branding, readability, and user experience. Over time, you’ll develop a visual style that readers recognize instantly.
Remember, all blog images on your website are an opportunity to make a great first impression. Make it count.
Disclosure: We sometimes use affiliate links in our content. Some of the links in this post are “affiliate links.” This means if you click on the link and purchase the item, we will receive an affiliate commission. It helps our website keep running and allows us to offset our writing team’s costs. Thanks for your support.