
Images make websites more attractive, useful, and engaging. But they can also become one of the biggest reasons a webpage feels slow.
A page with a large hero image, several screenshots, product photos, thumbnails, and graphics can require a lot of data before everything fully loads. This can be especially noticeable on mobile devices or slower connections.
This is where Lazy Loading Images can make a real difference.
Lazy loading delays loading images that aren’t immediately needed. Instead of downloading every image as soon as someone opens a webpage, the browser can wait until an image is close to becoming visible.
The result can be a faster initial page load, less unnecessary data transfer, and a smoother browsing experience.
The good news for WordPress users is that you usually do not need complicated JavaScript to get started. WordPress has supported native image lazy loading since version 5.5, using the standard HTML loading="lazy" attribute.
In our guide, we look at how Lazy Loading Images works, how it affects SEO and Core Web Vitals, how to use it in WordPress, common mistakes to avoid, and the best practices I recommend for modern websites.
What Is Lazy Loading?
Lazy loading is a performance technique that delays loading non-critical resources until they are needed.
For images, this usually means images below the initial viewport are not downloaded immediately. Instead, the browser waits until the visitor scrolls close to the image.
For example, imagine a blog post containing 15 images.
When the visitor first opens the article, they may only see the featured image and the first few paragraphs. Loading all 15 images immediately can waste bandwidth because the visitor may never scroll far enough to see the rest.
With lazy loading images, the browser can prioritize the content that matters first and load additional images as the visitor moves down the page.
Modern browsers support native lazy loading through the HTML loading attribute. A basic example looks like this:
<img src="example.jpg" width="800" height="533" loading="lazy" alt="Example description">The loading="lazy" attribute tells the browser that the image can be loaded later.
According to MDN, lazy loading can reduce the resources needed during the initial page load and help shorten the critical rendering path.
How Lazy Loading Images Improves Website Performance
One of the biggest advantages of Lazy Loading Images is that it reduces the amount of work the browser needs to perform during the initial page load.
A page with 20 large images does not necessarily need to download all 20 before a visitor can start reading.
Lazy loading allows the browser to focus on resources that are immediately useful.
This can provide several benefits:
- Faster initial loading.
- Less bandwidth consumption.
- Reduced network competition between images.
- Better perceived performance.
- Improved experience on mobile devices.
- Fewer unnecessary image downloads.
This is particularly useful for long-form articles, image galleries, online stores, portfolios, and media-heavy homepages.
However, lazy loading is not a replacement for image optimization.
A 2 MB image that loads later is still a 2 MB image.
For the best results, combine lazy loading images with appropriate image dimensions, compression, modern formats such as WebP or AVIF, responsive images, and good caching.
Lazy Loading Images and SEO
Lazy loading can support SEO indirectly by improving the performance and user experience of a webpage.
Google has made page experience and performance important parts of modern search optimization, while its image SEO documentation also recommends optimizing images for speed and quality. Google specifically notes that images can be a major contributor to page size.
There is another important SEO consideration: Google must still be able to discover your images.
If you implement lazy loading incorrectly with JavaScript, you could accidentally make important content difficult for search engines to access.
Google recommends using standard HTML image elements and making sure lazy-loaded content becomes available when it enters the viewport.
For most websites, native browser lazy loading is therefore a sensible approach.
You should also continue following standard image SEO practices:
- Use descriptive filenames.
- Write useful ALT text.
- Use responsive images.
- Compress images.
- Choose suitable image formats.
- Provide image dimensions.
- Use standard
<img>elements. - Create an image sitemap when appropriate.
Lazy loading should be considered one part of a larger image SEO strategy.
Lazy Loading Images and Core Web Vitals
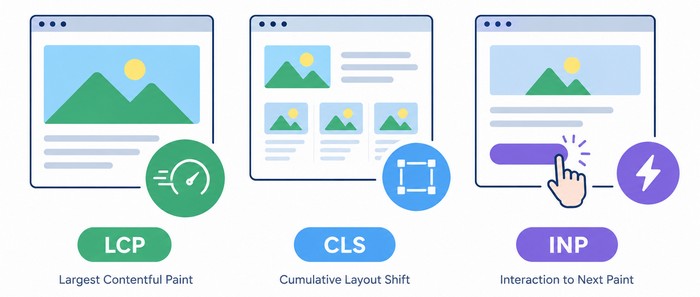
Core Web Vitals measure important aspects of real-world website performance.
Three metrics are particularly important:
Largest Contentful Paint (LCP)
Largest Contentful Paint (LCP) measures how quickly the largest visible content element is rendered.
That element can be an image, video, or large text block.
Google’s recommended target for a good LCP is 2.5 seconds or less at the 75th percentile.
This creates an important rule:
Do not blindly lazy-load your most important above-the-fold image.
If your featured image or hero image becomes the LCP element, delaying it can work against your performance goals.
Images that appear below the initial viewport are much better candidates for lazy loading.
Cumulative Layout Shift (CLS)
Cumulative Layout Shift (CLS) measures unexpected movement of content while a page loads.
Images without defined dimensions can cause a common problem.
Imagine reading a paragraph when an image suddenly loads above it. The image pushes the text downward, and you lose your place.
That is a layout shift.
Google recommends keeping CLS at 0.1 or below for a good user experience.
The solution is simple: provide image dimensions or otherwise reserve the correct amount of space.
For example:
<img src="landscape.webp" width="1200" height="800" loading="lazy" alt="Mountain landscape at sunset">The browser can use those dimensions to calculate the image’s aspect ratio before the file finishes downloading.
Interaction to Next Paint (INP)
Interaction to Next Paint (INP) measures how quickly a page responds to user interactions.
Lazy Loading Images is not primarily an INP optimization technique, but reducing unnecessary resource loading can contribute to a lighter page and a less crowded loading process.
The broader lesson is simple: optimize the entire page rather than treating lazy loading as a standalone solution.
Does WordPress Support Lazy Loading Images?

Yes.
This is one of the most useful things WordPress users should know.
WordPress introduced native Lazy Loading Images in version 5.5.
The feature uses the browser’s native loading="lazy" functionality rather than requiring a JavaScript-based lazy-loading system.
WordPress can automatically add loading optimization attributes to images generated through core functionality.
This means many WordPress websites already have lazy loading enabled without the site owner needing to install a separate lazy-loading plugin.
WordPress has also refined its implementation over time. In WordPress 5.9, the lazy-loading behavior was improved to avoid unnecessarily delaying images in the initial viewport because that could negatively affect LCP.
That is good news for WordPress users.
Why Use a Lazy Loading Plugin When WordPress Already Has It Built In?
If WordPress already supports lazy loading images, you may wonder why you would need a separate plugin.
The answer is that native WordPress lazy loading provides a useful foundation, but a dedicated performance plugin can give you much more control over how images are loaded and optimized.
Depending on the plugin, you may get features such as advanced lazy loading, image compression, WebP and AVIF conversion, responsive image delivery, CDN integration, placeholder images, and controls for excluding specific images from lazy loading.
This can be particularly useful for image-heavy websites, online stores, portfolios, and sites that need more detailed performance optimization.
However, a plugin is not automatically better. If your website already performs well with WordPress’s native lazy loading, adding another plugin may provide little benefit and could create conflicts with your existing caching or optimization tools.
The best approach is to test your site first and add a lazy-loading plugin only when you need the additional features or control.
How to Implement Lazy Loading Images
Method 1: Use Native HTML
For a custom HTML page, the simplest implementation is:
<img src="photo.webp" width="1200" height="800" loading="lazy" alt="Beautiful mountain landscape">This approach is lightweight because it does not require an additional JavaScript library.
Native browser lazy loading is widely supported in modern browsers.
Method 2: Let WordPress Handle It
For most WordPress websites, the easiest approach is to let WordPress handle native lazy loading.
Keep WordPress updated and use the standard image tools provided by the editor and your theme.
You can inspect the page source or use browser developer tools to check if your images contain:
loading="lazy"Remember that the exact loading behavior can depend on the image, theme, WordPress version, and other optimization systems.
Method 3: Use an Image Optimization Plugin
Some WordPress performance and image optimization plugins provide lazy loading alongside image compression, WebP or AVIF conversion, CDN delivery, and other performance features.
Examples include:
- Optimole — image optimization, responsive delivery, WebP/AVIF conversion, CDN delivery, and lazy loading.
- LiteSpeed Cache — caching, image optimization, CDN-related features, and lazy load for images.
- Other performance plugins may also provide lazy-loading functionality.
Optimole currently combines image optimization, WebP/AVIF conversion, CDN delivery, and intelligent lazy loading.
LiteSpeed Cache also includes Lazy Load for Images and image optimization features, although its server-level caching features are designed around LiteSpeed environments.
The key is to avoid stacking multiple plugins that perform exactly the same task.
When Should You Not Lazy-Load an Image?
This is one of the most important lazy loading images best practices.
Not every image should be lazy-loaded.
The biggest mistake is applying loading="lazy" to an important image that appears immediately when the page opens.
For example, imagine a blog post where the featured image is the largest element in the initial viewport.
That image could become the LCP element.
Delaying it may make the page appear slower.
Instead, prioritize the important above-the-fold image and lazy-load images further down the page.
A simple rule is:
Load critical images early. Load non-critical images later.
This approach gives the browser a clearer loading priority.
Lazy Loading Images Best Practices

1. Do Not Lazy-load Everything
Lazy loading should be selective.
Images below the fold are generally strong candidates. Important above-the-fold images often need faster loading.
2. Always Define Image Dimensions
Use width and height attributes or an appropriate aspect-ratio strategy.
This helps the browser reserve space and reduces layout shifts.
3. Compress Images Before Uploading
Lazy loading does not make an oversized image smaller.
Resize images to an appropriate display size and compress them before publishing.
4. Use Modern Formats
WebP and AVIF can often provide smaller files while maintaining good visual quality.
Google supports formats including JPEG, PNG, WebP, SVG, and AVIF for image search.
5. Use Responsive Images
Do not send a huge desktop image to a small smartphone unnecessarily.
WordPress already provides responsive image functionality using attributes such as srcset and sizes, while Google’s image SEO documentation recommends responsive image techniques.
6. Write Useful ALT Text
ALT text should describe the actual image.
For example:
Poor:
image123.jpgBetter:
Laptop displaying a fast-loading website optimized with Lazy Loading ImagesKeep ALT text descriptive and natural. Avoid stuffing the keyword into every image.
7. Test Your Pages After Implementation
Use tools such as:
- Google PageSpeed Insights: Is an excellent first step. It can identify image delivery problems, Core Web Vitals issues, and other performance opportunities.
- Google Lighthouse: is useful for testing individual pages and inspecting performance recommendations.
- Google Search Console: provides useful tools and reports that help you monitor your website’s search traffic, understand its performance, identify and fix potential issues.
- LogicMonitor (Former WebPageTest): Provides more detailed waterfall information and can help you see exactly when images are requested.
Testing is important because lazy loading can interact with themes, plugins, JavaScript, CDNs, responsive images, and caching systems.
You can also open your browser’s Developer Tools, inspect an image, and look at the Network panel to understand when individual image requests occur.
This is particularly helpful when troubleshooting a page that appears to load too many images immediately.
Common Lazy Loading Mistakes
Lazy loading sounds simple, but poor implementation can create new problems.
Mistake 1: Lazy-loading the LCP image: This can delay the most important visual element on the page.
Mistake 2: Using too many optimization plugins: Two plugins attempting to lazy-load the same images can create conflicts or unnecessary processing.
Mistake 3: Forgetting image dimensions: An image can still cause layout shifts even when it is lazy-loaded.
Mistake 4: Replacing standard image markup with inaccessible JavaScript: Google recommends making sure lazy-loaded content can be discovered and loaded without relying on user actions such as clicking or scrolling.
Mistake 5: Thinking lazy loading replaces compression: It doesn’t. A well-optimized 150 KB image is still preferable to a 2 MB image that happens to load later.
Mistake 6: Ignoring mobile performance: A page that feels fast on a desktop connection can feel very different on a mobile device. Always test your pages on different screen sizes and connection conditions.
A Simple Lazy Loading Workflow for WordPress
For a typical WordPress website, I would approach Lazy Loading Images like this:
Upload → Resize → Compress → Choose WebP/AVIF → Add ALT Text → Use Responsive Images → Lazy-load Non-critical Images → Test → Monitor
This workflow is more effective than simply installing a lazy-loading plugin and assuming the job is finished.
The goal is not to make every image load slowly.
The goal is to make the right images load at the right time.
The Bigger Picture: Lazy Loading Is Part of Image Optimization
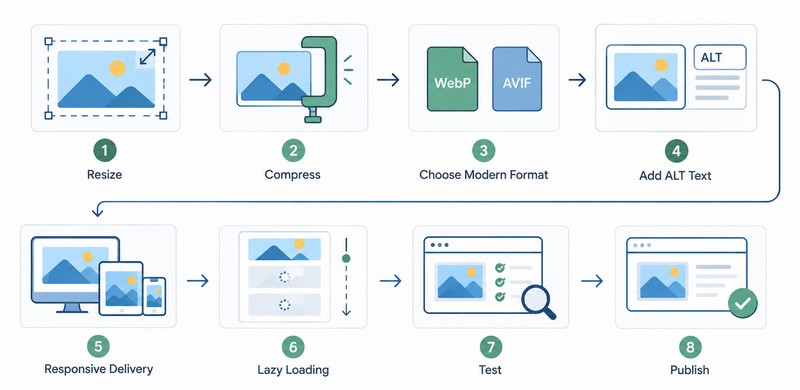
Lazy Loading Images is an important performance technique, but it works best as part of a complete image optimization strategy.
Think about it this way:
Compression reduces how much data an image contains.
Resizing prevents unnecessarily large images from being downloaded.
Modern formats can reduce file size while maintaining image quality.
Responsive images help browsers choose an appropriate image for the device.
Lazy loading prevents non-critical images from being downloaded too early.
Together, these techniques can create a much faster and more efficient website.
Final Thoughts
Lazy Loading Images is one of those web performance techniques that can sound more complicated than it really is.
The basic idea is straightforward: do not make visitors download images they do not need yet.
For long articles, galleries, portfolios, e-commerce pages, and image-heavy websites, this can reduce unnecessary network activity and help the browser focus on the content that matters first.
WordPress makes the process even easier because native lazy loading has been part of WordPress since version 5.5.
Still, I would not recommend blindly enabling lazy loading for every image.
Pay particular attention to images in the initial viewport and potential LCP elements. Give images proper dimensions, compress them, use responsive delivery, choose efficient formats, and test the final result.
When these techniques work together, lazy loading images becomes much more than a simple performance trick. It becomes an important part of a thoughtful image optimization strategy that benefits website speed, user experience, SEO, and Core Web Vitals.